
The sailing vessel Bailarina
We haven't been everywhere, but it's on the list!
How It All Began

Sea Major
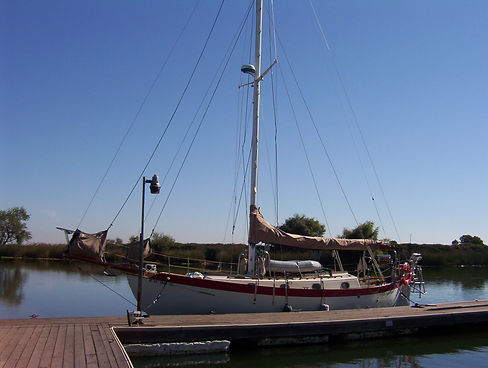
Once we decided that we were going cruising, we had to buy a boat that would be a dependable ocean cruiser. Jim knew exactly what he wanted--a Westsail 32. The Westsail 32 is a great example of early very seaworthy boat design. It is very heavily constructed, has a safe well laid out deck and cockpit, lots of interior space and storage, the cutter rig is easily handled and flexible. From the moment you step aboard one, you get the feeling that you belong at sea, and from experience I can say that this boat can handle a lot while keeping her crew safe. She is not very fast, and does not cut a lot of corners to accommodate the modern view of what sailing is about, but she will get you there and back, and has proven herself time and time again for sailors all over the world.
We already owned a small Hunter that was great for sailing in the Delta and on the bay, but was too light for open ocean. Now the problem in finding a Westsail 32 was that being an old boat that has been out of production for many years, they came in two categories: those that have been kept up and in good shape that were well out of our price range, and those that were affordable but were in various degrees of disrepair. After many failed searches, we found one in a nearby marina that was not in the greatest shape, but had potential, was seaworthy, and was in our price range--Sea Major.
Sea Major was a Westsail "kit" boat built in 1978. I believe we are her 3rd owners. She had done some coastal cruising, and had gone through more than one partial refit, but was due for some upgrades.
So for the next year, we lived on our Hunter in the Delta waters of Stockton while completely gutting and remodeling the interior and refitting the exterior of the Westsail. Jim never wavered in his vision of what our boat would become, but I'll admit that I shed more than a few tears as I wondered how it would all come together into the boat that I now love.

gutted our V-berth


Partial list of exterior and system refits:
Replaced the original Perkins engine with a Beta Marine 38. this included a new prop shaft, prop, and cutlass bearing.
Completely replaced the standing rig including the chain plates.
Sanded and refinished the mast.
Scraped of the painted green stipe and buffed out the gel-coat to reseal her original red stripe
Repaired bottom blisters and applied epoxy barrier coat to hull.
Refinished and sealed all the topside wood.
Added a used Monitor wind vane to drive the boat.
Added a Furuno radar
Replaced the mainsail
Being a kit boat, the interior had "evolved" over time as envisioned by the previous owners which didn't match up with our vision. This along with some neglect/damage meant that it was time for our turn at a facelift.
Reshaped and varnished strip wood interior siding,
Tiled the galley countertop and head
Installed new sinks in with the galley and head
Made new cushions an covers for saloon and V-berth
Built seating and storage on the starboard side of saloon
Replaced the headliner in the V-berth and head
Cleaned and painted all the locker interiors
Replaced all plumbing
Replaced all wiring and electrical systems
Rebuilt the head
Added a Lectrasan waste treatment unit
Just over a year later, with our list of projects not yet completed (are they really ever?), and out refit/remodel budget drained, it was time to head to the bay to catch our weather window out the Golden Gate and sail South.
new engine and old engine
Port side saloon
port side galley
There was just one more thing that we had to complete: renaming the boat and its home port. Most sailors consider it bad luck to change the name of a boat and require various ceremonies (including having a virgin pee in the bilge), to ward off that bad luck. But in spite of not being able to find a virgin to pee in our bilge, we strongly felt that after all our work on her, that she needed a new name. Since we had done most the work tied up to the dock below The Rusty Porthole in Bethel Island and had become like family with the owners and regular patrons of the bar at that time, we chose Bethel Island as our home port.

The head

Fresh bottom paint
on the hard in Stockton
Bailarina
Ready to head to the Bay
Bethel Island
Adventures in Mexico 2004-2005
Here we will add pictures and summary of our year sailing in Mexico
Check back later...
Back to Mexico 2017: Our Second Retirement
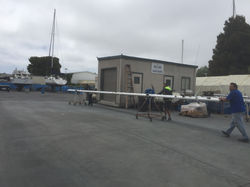
After 10 years of neglect, being left in Oakland while we moved to Texas, Bailarina is in some serious need of TLC. Our first goal was to get her to Mexico where we could afford to keep her while doing the work--and afford to hire out some of the work. Because her topsides were leaking badly (the teak rail needed to be removed, epoxied, and resealed be for we could even consider sailing at sea), we decided to have her put on a truck to be transported to Guaymas in Sonora Mexico. We used Takata Transport. They took care of many of the details and everything went very smoothly--we highly recommend them.
To prepare her for transport, we needed to take down the mast. We have a tabernacled mast, so we decided to save some money (quite a bit actually), and bring it down ourselves--something we have never done. Thanks to a YouTube video and our best friend Tim, it went off seamlessly. It was quite a hair raising experience knowing how many things could go wrong, damaging our boat or those docked next to us in the process! I wasn't the only one documenting. There were several guys on shore videotaping with their iPhones--though I think they were hoping for a great video with a different outcome! Be sure to check out the video of the final moments of taking down the mast.
Taking Down the Mast
 loosening the turnbuckles |  glad we added mast steps |  here we go... |
|---|---|---|
 slowly... |  easy... |  easy!.. |
 Success! |  whew! |  removing the boom |
 Hercules, Hercules! |  motoring to Grand Marina for haul out |  removing the mast |
 |  |  pushing her around to the sling |
 |  |  up, up, and away... |
 |  |  securing her to the truck |
 |  Loaded up and ready to roll |
Two Months of Projects in Guaymas
We both had plenty of work to do on the boat to get her ready to sail and live aboard. We rented an apartment in San Carlos right off the beach for December and January. Our goal was to "splash" (this is what they call putting your boat back in the water at Marina Guaymas), by February--which I'm happy to report that we did. While all of our projects are meaningful to us, we realize that it doesn't hold as much interest for others. In addition, we have not kept our site updated in the past 6 months and are back in New Mexico now beginning our projects for the season at the cabin; so we will list a few of the projects that kept us busy for two months "on the hard" (this is what they call it when your boat is on land).
The biggest, most difficult and important project was to fix the leaking rail all along the gunnels. Back in July, when it was 98-100 degrees and 98-100 percent humidity, Jim drove to Guaymas to help Alejandro remove the sail track and the teak on the cap rail while leaving it in good enough condition to put back on. Then Alejandro sealed the cap rail by fiberglassing over the top while we were in NM working on the cabin. When we returned to Mexico in December, we put the wood and rails back on and tried our best to make it look...if not pretty, at least not derelict, with plenty of thickened epoxy and Cetol Oil. Also while we were gone, we hired Gama to weld a stainless steel railing around the boat for increased safety, replacing the cable safety line.
I know I promised not to belabor the projects, but there is one other unanticipated project that took up a significant amount of time and money. Jim found some rot in our wooden bow sprit, so it needed to be replaced. We decided to replace it with a stainless sprit and used some of the good wood from the old sprit to replace one of the backstay supports where he also found some rot. Here is the afore promised "list" of projects completed on the boat this year:
Sand and Cetol Oil on all exterior wood
Sand bottom and new bottom paint
Replace propeller and cutlass bearing
Engine room maintenance and repair/updates
Update lighting to LED internally and externally
Step the mast and repair mast step
Replaced running rigging
Added propane system
Added solar power
Added oven in galley
Some miscellaneous fiberglass work
Lots of sewing: all new cushion covers, and external canvas covers, anchor sail, bug netting for ports and hatches
Replaced V-berth cushions
Installed Safety netting
A few cosmetic repairs
Radar repair (unexpected) lots of hours troubleshooting and many trips up the mast
Whew! That's a lot of work for two months. We worked every day for those two months with the exception of Christmas (when we summited Mt. Tetakawi), and New Year's Day (when we were recovering from the previous evenings libations).
 Anchor sail at work in Altata, MX |  Check out that stainless steel bow sprit! |  A view of solar panels from the mast |
|---|---|---|
 Nice new galley stove |  Netting to prevent everything from flying out under way...we hope |  New Cushion covers and pillows |