Welcome Wilton!
- Sep 30, 2021
- 7 min read
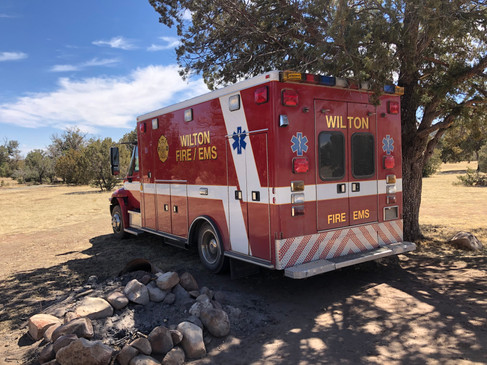
While being "stuck" at home in quarantine and unable to go to the sailboat in Mexico, Jim and I began to think about how having a way to travel the road that is self contained would allow us to travel and have adventures while still maintaining a mostly quarantine lifestyle. We thought about a Sprinter van or motorhome, but being budget-minded project people, we began to explore other options. We zoned in on buying an out of commission ambulance and never looked back. We ended up finding what we wanted in Wilton, Iowa at the end of March and made an offer. The city accepted our offer, so we raced out of town trying to stay ahead of a late season snow storm. We drove for two days and were beyond excited to see her. She is a 2007 International medium duty diesel truck with a Road Rescue box. We decided to name her Wilton (or Ms. Wilton for those that think that Wilton is not a feminine sounding name), because it just felt right. We took a much more leisurely pace driving back home. We slept in Wilton each night taking turns with one of us sleeping on a camping mat on the floor while the other one slept on the bench seat (Lily going back and forth between us when someone gave her some room). The trip home gave us lots of time to dream and plan the renovation. Here she is as we received her:


There are so many advantages to an ambulance as apposed to other more traditional travel vehicles. It is a solid, sturdy vehicle built to withstand a rollover. It has a diesel engine that will run forever. There is lots of outside storage space in the outdoor lockers and cabinetry inside for indoor storage space. There are even a few lockers with access from the inside or outside. Just look at all this space!


But one of the biggest benefits is affordability (assuming you have the time and skills to do your own renovations). We began working on her nearly non-stop as soon as we got home. We had 30 days to get enough done so she could be registered as an RV here in New Mexico. We hear that others have problems getting insurance and re-registering an ambulance as an RV, but we were incredibly lucky and pulled it off without a hitch. And here is Wilton fully insured with plates that identify her as a registered New Mexican RV. We have removed all the decals except for her name.

We wanted a walk through from the cab to the box, however, Wilton only had a window pass-through that was used for passing paperwork. No problem, anything is possible with a reciprocating saw and a grinder! First, we removed the jump seat and the interior stand-alone cabinet from the box and the aluminum center console from the cab. Then, Jim cut through the two layers of aluminum on the box and two layers of steel on the cab. We ordered a length of accordion gasket to seal the cab to box while remaining flexible to allow movement between the two. Some creative adjustments were needed to get a good fit for a proper seal. Jim used some scrap aluminum (cut from the ambulance) and wood to cover up where we removed the cabinet. Later in the renovations we added the tongue and groove cedar wood strips.


Before and after of the walkthrough to the cab


To make it a more functional walk-through from the cab to the box, we also cut down the center console control panel to make it more flush to the front of the cab giving us more space. This part of the project was a complicated puzzle of wiring, switches and relays. While many of the ambulance functions we no longer need, some things we wanted to keep or repurpose, so we didn't want to just get in there and tear out all the wiring. We are lucky enough to have the wiring diagram for our rig, but it is an extremely complicated system and an ongoing process to figure out. Many people don't realize just how complex the wiring is in an ambulance. There are literally hundreds of pounds of wires. We have a switch panel in the cab and the box as well as an electrical connection and fuse panel in the box and another in an outside locker. Additionally, there is a slew of extra wires that are not connected to anything that we assume are for features that this ambulance did not have.


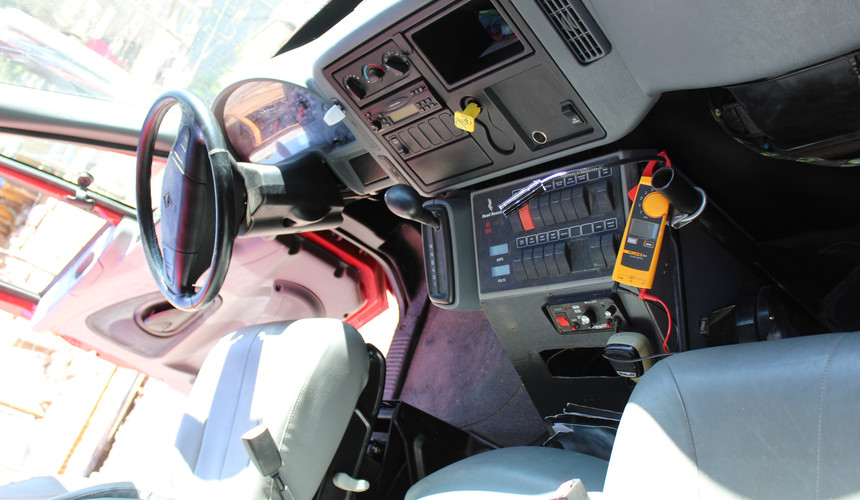


Before and after of the cab console and between the seats.


We decided that the best option for a bed for us would be pull out slat bed that could be a couch in the daytime and easily pull out as a bed at night--this was definitely a challenge to Jim's fine carpentry skills. We extended the depth of the original bench in order to have a full size bed. We also wanted to retain access to the storage under the bench.


Before and after of the bed


The kitchen counter is across for the couch/bed. Because we used the existing structure, it is a low counter that is meant to be used while sitting in the jump seat that we removed. The jump seat was too bulky to leave, so we have a small adjustable swivel stool that works perfect while cooking and washing dishes (and it makes a perfect foot stool while lounging on the couch!). First we cut through the stainless countertop for the sink. The hole leads to an outside locker where we put our fresh water and grey water tanks.


Then we cut another hole in the countertop for a small propane stove. You will notice that we also removed all the plaques, stickers, and outlets (including an outlet for oxygen, one for suction--yuck, and one for ???) from the back wall.


While putting in the sink and stove, we were going back and forth about putting in a butcher block. We like the look of wood, and it makes the area seem less sterile and ambulancey.


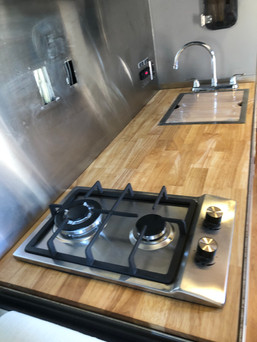


With some extra butcher block we cut a piece for the small counter at the far end. We also wired some 12v. usb chargers and restored an old teak boat shelf we had laying around. We wanted to keep the center part of the counter as a functioning chair with seatbelt, so we were not able to put wood there.


We heard of people using adhesive vinyl tiles in RVs, so we thought we would give it a try. It turned out okay, but what a mess! The instructions said to use spray adhesive in addition to the adhesive on the backs of the tiles. We did, and not only was there adhesive everywhere, but the extra adhesive didn’t leave any room for error in placing the tiles. But it is turn out pretty well in the end. I was worried about it being too close the flames and heat of the propane stove, so Jim cut a couple pieces of aluminum for a backsplash and to cover the underside of the cabinet above the stove. He even took a grinder to scratch out a nice pattern in the backsplash! We kept the 110v. outlet behind the sink and added a 12v. outlet and display.


Before and after of kitchen.


We put in laminate flooring.


We cut a 14 inch square in the roof to install a MaxxAir fan for ventilation.


We took out all the halogen lights on the vinyl ceiling, added some extra insulation, and put up cedar planks and dimmable 12v. LED puck lights. The most difficult part was lining up where to drill the holes to reinstall the vents for the heat and air conditioning, (the heat and air in the box only works when the engine is running, but we decided to keep it functional). We also put the stainless hand hold/safety bar back up. At the time we liked it since it would be handy to move about safely while in motion and it reminded us of being on our boat, but I'm sure that Jim has regretted it a thousand times as he bumps his head on it!


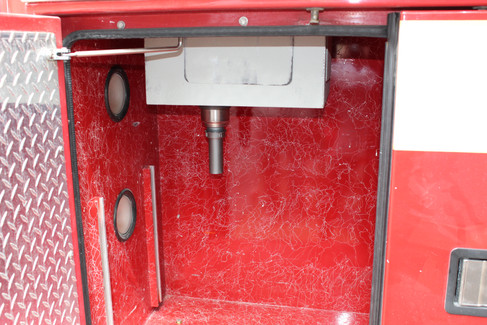
Remember that freestanding cabinet we removed forward in the cab? It was such a nice cabinet and had the only drawer inside the ambulance, we decided to re-use it. We cut through the interior wall and inset it into an outside locker. We cut the back out of the bottom part of the cabinet to gain access from the outside since it is where we store our portable canister toilet.


Here is the progress from the outside locker view.


We have also installed solar panels and an inverter for 110v. power. We attached low profile uni-strut to the roof, and connected the solar panels to the uni-strut. We currently have about 290 watts of solar, but we have a couple of small old panels on the boat that we will add to it this year. After a few shakedown camping trips, we realize that it is more comfortable to park in the shadiest spot possible, but the solar won't charge in the shade. So, we will two 100 watt flexible panels that can be set in the sun away from the ambulance and connected to the system to charge.


A few minor sewing projects for increased comfort included magnetic bug screens for the back and side doors and an outside cab shade cover with a cutout to see in front of the vehicle. As well as block out curtains for both doors and the walkthrough to the cab.


Another small detail that made a huge difference was applying vinyl cling to the cabinet windows.


For her age Wilton was in excellent condition. There were only a few mechanical issues when we got her. One of the thermistors for the air-conditioning was broken, so we ordered a new part. We took it to a shop that could recycle refrigerant to remove the refrigerant. They were kind enough to let Jim replace the broken part before re-filling the refrigerant. Since Wilton was from Iowa, there is some rust. The worst of it was the fuel tank (which we were aware of before buying). We took a trip to a salvage yard in Arizona and found a good replacement. We also purchased an air pressure tank so that we could replace it while it was all torn apart.


We will continue to work on smaller projects as they come to us, but for now we are ready to hit the road!


Comments